Safe inline editing of content using React 18, CodeMirror 6 and two custom plugins: dropdowns and auto-complete
Published
I’m a huge fan of empowering users.
But harsh lessons have taught me that giving people the ability to do anything means they’ll eventually do everything, and that includes finding a way to break your ‘precious’ code. Then they’ll (rightly) complain about it.
Imagine you’ve lovingly hand-crafted an advanced reporting system that allows users to write the calculations themselves, empowering them to get the data they want. And then it all goes pear-shaped because a hyphen was missing or someone changed a field’s name and now the report wont run.
I want to focus on that last example: someone changed a field’s name (and now the report wont run).
Now some would say “you should have made them use an id instead of letting them use a field name”. But that’s just going to increase the complexity, reduce your user’s morale and lead to higher churn.
So what if they could reliably use a field’s name in the calculations without having to worry about it changing in the future? That’s where React and CodeMirror come in.
Getting started
I’m not going to go into any significant details on setting up React from scratch. Chances are you’re neck-deep in a project and the last thing you want is a tutorial for setting up a new one. But just in case:
npm create vite@latest my-react-app -- --template reactI’m also not going to write a calculation system. Instead I’ll use one that already exists: JSONLogic, because that allows you to work with variables.
npm install json-logic-jsRemember, this isn’t about using the calculation system. It’s about building some guard-rails to protect your users… and your issue/ticket system from an avalanche of problems. Feel free to use your own calculation/query/logic system.
And to finish the setup, you’ll need to install some extra libraries:
"@codemirror/autocomplete": "^6.18.0",
"@codemirror/lang-json": "^6.0.1",
"@codemirror/state": "^6.4.1",
"@codemirror/view": "^6.30.0",
"codemirror": "^6.0.1",
Introduction
My system involves pies — because that’s what several of the examples on the JSONLogic site uses. I want to know when the internal temperature of an apple pie reaches 310 degrees (F). The pseudocode might look like this:
if (Filling === "apple" && Temperature >= 310) return true;And the JSONLogic would be this:
{
  "and": [
    {
      "==": [
        {
          "var": "Filling"
        },
        "apple"
      ]
    },
    {
      ">=": [
        {
          "var": "Temperature"
        },
        310
      ]
    }
  ]
}
(Imagine someone changes Temperature to Temp (F) in the data but doesn’t change the calculation)
So let’s make a React component (App.js) to get started:
// src/App.jsx

import { useState } from "react";
import jsonLogic from "json-logic-js";

// if (Filling === "apple" && Temperature >= 310) return true;
const logicOriginal = `{
  "and": [
    {
      "==": [
        {
          "var": "Filling"
        },
        "apple"
      ]
    },
    {
      ">=": [
        {
          "var": "Temperature"
        },
        310
      ]
    }
  ]
}`;

const data = {
  "Filling": "apple",
  "Temperature": 310,
};

export const App = () => {
  const [logic, setLogic] = useState(logicOriginal);

  const checkLogic = () => {
    const logicParsed = JSON.parse(logic);
    alert(jsonLogic.apply(logicParsed, data));
  };

  return (
    <>
      <button onClick={() => checkLogic()}>Check</button>
    </>
  );
};
This component sets the stage for the Editor component which you’re going to create in the next step. I’ve also added the path of the file at the top.
How you get/use the logic and data is entirely up to you. I’m just keeping it simple here.
And if you just wanted to see an example of JSONLogic used with React, then you’re done! Otherwise, there’s more to do.
Getting CodeMirror into React
CodeMirror allows for you to write your own extensions. We’re going to take advantage of that, but we need to ensure there will be a pathway for us that doesn’t involve too much pain in the future.
Start with the hooks
This is the first of two hooks. If you go through the documentation for CodeMirror 6 you’ll see some similarities with the EditorView. The purpose of this hook is to provide a connection between React and the CodeMirror editor.
// src/components/Editor/hooks/codeMirror.js

import { useState, useRef, useEffect } from "react";
import { EditorView, basicSetup } from "codemirror";
import { EditorState } from "@codemirror/state";
import { json } from "@codemirror/lang-json";

export const useCodeMirror = ({ value, extensions }) => {
  const ref = useRef();
  const [view, setView] = useState();

  useEffect(() => {
    const view = new EditorView({
      state: EditorState.create({
        doc: value,
        extensions: [basicSetup, json(), ...extensions],
      }),
      parent: ref.current,
    });

    setView(view);

    return () => {
      view.destroy();
      setView(undefined);
    };
  }, []);

  return { ref, view };
};
I’m using JSON as the supported language, but your language might be different.
The second hook handles the updates. You can see how it uses the useCodeMirror hook and passes the soon-to-be-build extensions:
// src/components/Editor/hooks/codeEditor.js

import { useEffect } from "react";
import { EditorView } from "@codemirror/view";

import { useCodeMirror } from "./codeMirror";

const onUpdate = (onChange) => {
  return EditorView.updateListener.of((viewUpdate) => {
    if (viewUpdate.docChanged) {
      const { doc } = viewUpdate.state;
      const value = doc.toString();
      onChange(value, viewUpdate);
    }
  });
};

export const useCodeEditor = ({ value, onChange, extensions }) => {
  const { ref, view } = useCodeMirror({
    value,
    extensions: [onUpdate(onChange), ...extensions],
  });

  useEffect(() => {
    if (view) {
      const editorValue = view.state.doc.toString();

      if (value !== editorValue) {
        view.dispatch({
          changes: {
            from: 0,
            to: editorValue.length,
            insert: value || "",
          },
        });
      }
    }
  }, [value, view]);

  return ref;
};
And finally the Editor component itself:
// src/components/Editor/index.jsx

import { useCodeEditor } from "./hooks/codeEditor";

const CodeEditor = ({ value, onChange, extensions }) => {
  const ref = useCodeEditor({ value, onChange, extensions });
  return <div ref={ref} />;
};

export const Editor = ({ logic, setLogic }) => {
  const handleChange = (value) => {
    setLogic(value);
  };

  return (
    <div>
      <CodeEditor
        value={logic}
        onChange={handleChange}
        extensions={[]}
      />
    </div>
  );
};
The extensions prop is an empty array at the moment. That will change soon.
Now go back to src/App.jsx and import the Editor:
// src/App.jsx

import { useState } from "react";
import jsonLogic from "json-logic-js";

import { Editor } from "./components/Editor";
Replace field names with UUIDs
If a user writes a calculation with the wrong structure then you could argue that it’s their fault (as long as let them know where the problem is).
But if something works and then suddenly stops? That’s on you. Someone changes the Temperature field to Temp (F) because they thought they were being helpful? That’s your problem now.
Instead of forcing your users to use ID, what if you used the ID in the calculation but the users only saw the friendly field names?
Let’s make some changes to src/App.jsx:
import { Editor } from "./components/Editor";

const variables = {
  "2620b98f-a4d3-4961-bf6a-e5babcd3b292": "Filling",
  "b0b1e5b1-4a7d-4b8a-8b2c-0b1b9c9c1b2b": "Temperature",
};
Filling and Temperature are still there, but we want to represent them in the calculation as UUIDs (and yes, you could use another ID system like Sqids).
Some more changes are needed:
// if (Filling === "apple" && Temperature >= 310) return true;
const logicOriginal = `{
  "and": [
    {
      "==": [
        {
          "var": "2620b98f-a4d3-4961-bf6a-e5babcd3b292"
        },
        "apple"
      ]
    },
    {
      ">=": [
        {
          "var": "b0b1e5b1-4a7d-4b8a-8b2c-0b1b9c9c1b2b"
        },
        310
      ]
    }
  ]
}`;

const data = {
  "2620b98f-a4d3-4961-bf6a-e5babcd3b292": "apple",
  "b0b1e5b1-4a7d-4b8a-8b2c-0b1b9c9c1b2b": 310,
};
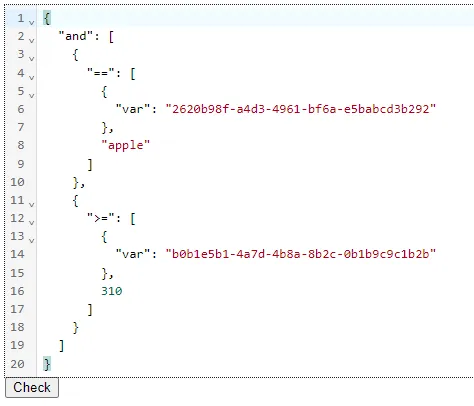
JSONLogic doesn’t care what the variable names are, just as long as they’re unique. But right now your user-experience has gone out the window:
Let’s start on the extensions.
Replacing UUIDs with dropdowns
CodeMirror is very flexible when it comes to extensions. You just have to deal with some very specific code to make it work.
This extension creates a replacer widget: it replaces what’s currently visible with something else. There will be some iteration of this, but to get started:
// src/components/Editor/plugins/VariableDropdown/Widget.js

import { WidgetType } from "@codemirror/view";

export default class VariableDropdownWidget extends WidgetType {
  constructor(name, variables) {
    super();

    this.name = name;
    this.variables = variables;
  }

  eq(other) {
    return this.name === other.name;
  }

  toDOM() {
    let elt = document.createElement("span");
    elt.style.cssText = `
      border: 1px solid #0000FF;
      border-radius: 8px;
      padding: 0 4px;
      background: #EEEEFF;`;
    elt.textContent = this.variables[this.name];
    return elt;
  }
}
UUIDs have the advantage of being easy to validate. Which is really useful for the next step.
This code will import the class you just created, find and visually replace any UUID it finds with the field name:
// src/components/Editor/plugins/VariableDropdown/index.js

import {
  Decoration,
  EditorView,
  ViewPlugin,
  MatchDecorator,
} from "@codemirror/view";

import VariableDropdownWidget from "./VariableDropdownWidget";

const createPlaceholderMatcher = (variables) =>
  new MatchDecorator({
    // Get the uuid between quotes (e.g. "123e4567-e89b-12d3-a456-426614174000")
    regexp:
      /"([0-9a-f]{8}-[0-9a-f]{4}-[1-5][0-9a-f]{3}-[89ab][0-9a-f]{3}-[0-9a-f]{12})"/g,
    decoration: (match) =>
      Decoration.replace({
        widget: new VariableDropdownWidget(match[1], variables),
      }),
  });

export const variableDropdownPlugin = (variables) => {
  const placeholderMatcher = createPlaceholderMatcher(variables);

  return ViewPlugin.fromClass(
    class {
      placeholders;
      constructor(view) {
        this.placeholders = placeholderMatcher.createDeco(view);
      }
      update(update) {
        this.placeholders = placeholderMatcher.updateDeco(
          update,
          this.placeholders
        );
      }
    },
    {
      decorations: (instance) => instance.placeholders,
      provide: (plugin) =>
        EditorView.atomicRanges.of((view) => {
          return view.plugin(plugin)?.placeholders || Decoration.none;
        }),
    }
  );
};
The createPlaceholderMatcher looks for the UUIDs in the editor view, passing the variables to the VariableDropdownWidget.
If you ran the code now you’d get an error because you haven’t passed the variables to the Editor, so we should do that now.
In src/App.jsx you need to add the variables prop:
  return (
    <>
      <Editor variables={variables} logic={logic} setLogic={setLogic} />
      <button onClick={() => checkLogic()}>Check</button>
In src/components/Editor/index.jsx you need to add the plugin you just created:
import { variableDropdownPlugin } from "./plugins/VariableDropdown";

// ...

  return (
    <div>
      <CodeEditor
        value={logic}
        onChange={handleChange}
        extensions={[
          variableDropdownPlugin(variables)
        ]}
      />
    </div>
  );
And if that went well, you should now see this:
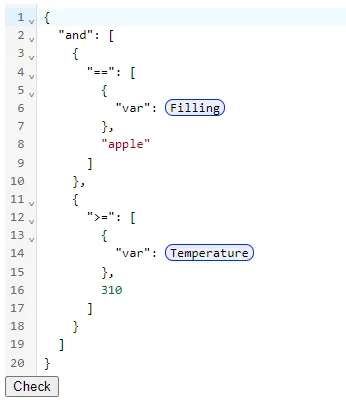
The UUIDs have been successfully replaced with their more human-friendly labels. Now we need to add a way to change them.
Go back to src/components/Editor/plugins/VariableDropdown/Widget.js and make some changes to the class:
  constructor(name, variables) {
    super();

    this.name = name;
    this.variables = variables;
    this.hasChanged = false; // this is new
  }

// ...

  toDOM() {
    // Create a dropdown element
    const select = document.createElement("select");
    select.className = "cm-variable-dropdown";

    // Add options to the dropdown
    Object.entries(this.variables).forEach(([key, value]) => {
      const option = document.createElement("option");
      option.value = key;
      option.text = value;
      select.appendChild(option);
    });

    // Set the selected value
    select.value = this.name;

    select.onchange = (e) => {
      this.hasChanged = true;
    };

    // Return the dropdown element
    return select;
  }

  ignoreEvent() {
    if (this.hasChanged) {
      this.hasChanged = false;
      return false;
    }
    return true;
  }
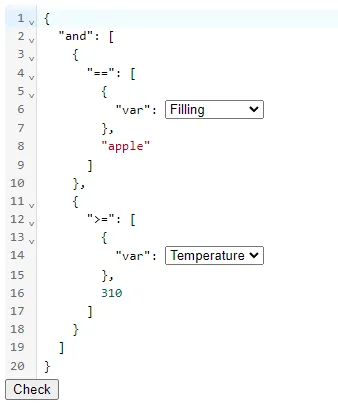
Instead of showing an outline this will now show a select element with all the potential options. The hasChanged is new too, and that will be explained after you make a change to src/components/Editor/plugins/VariableDropdown/index.js:
      provide: (plugin) =>
        EditorView.atomicRanges.of((view) => {
          return view.plugin(plugin)?.placeholders || Decoration.none;
        }),

      // this is new
      eventHandlers: {
        change: (e, view) => {
          const { target } = e;
          if (
            target.nodeName == "SELECT" &&
            target.classList.contains("cm-variable-dropdown")
          ) {
            const pos = view.posAtDOM(target);
            const charCount = target.value.length;
            view.dispatch({
              changes: {
                from: pos + 1,
                to: pos + charCount + 1,
                insert: target.value,
              },
            });

            return false;
          }
        },
      },
Normally these replacer widgets in CodeMirror wouldn’t support the needed level of functionality for a select element. We need to be able to click on it, select what we want, and have the content change to that value.
The ignoreEvent in the class determines how events should be handled, and we need that to change based on what we’re doing. The change event is propagated because we disable events from being used in the select element once the change is done, and the change event is picked up in the global handler.
(Yeah, it’s a bit chaotic, but it works)
You should now see something like this:
If you want you can go into src/App.jsx and add something to see the logic change:
  return (
    <>
      <Editor variables={variables} logic={logic} setLogic={setLogic} />
      <button onClick={() => checkLogic()}>Check</button>

      <h2>Debugging</h2>
      <pre>{logic}</pre>
    </>
  );
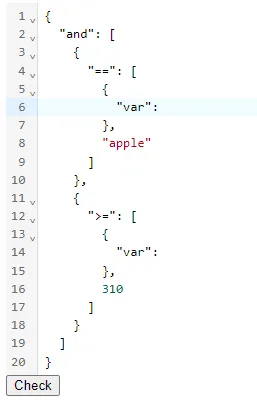
You’ve successfully replace complex UUIDs with field names. And they only way to screw that up is if you delete the field name from the UI, like this:
Which brings us to the final part.
Creating custom dropdowns to add UUIDs
You don’t want to burden users with having to know the UUIDs of every field they want to use. So what better way to empower them than to let them easily choose which field they want and let your code handle the rest.
Time for another plugin, but this one is much simpler because CodeMirror handles much of the complexity:
// src/components/Editor/plugins/AutoComplete/index.js

export const autoCompleteVariables = (variables) => (context) => {
  // Create an array of options from the variables
  // [{ label: "Filling", type: "2620b98f-a4d3-4961-bf6a-e5babcd" }]
  const options = Object.entries(variables).map(([key, value]) => ({
    label: value,
    type: "text",
    apply: `"${key}"`,
  }));

  return {
    from: context.pos,
    options,
  };
};
When we pass this plugin the variables we want it to create a nice and friendly menu.
Here’s the complete version of the Editor component:
// src/components/Editor/index.jsx

import { autocompletion } from "@codemirror/autocomplete";

import { useCodeEditor } from "./hooks/codeEditor";
import { variableDropdownPlugin } from "./plugins/VariableDropdown";
import { autoCompleteVariables } from "./plugins/AutoComplete";

const CodeEditor = ({ value, onChange, extensions }) => {
  const ref = useCodeEditor({ value, onChange, extensions });
  return <div ref={ref} />;
};

export const Editor = ({ variables, logic, setLogic }) => {
  const handleChange = (value) => {
    setLogic(value);
  };

  return (
    <div>
      <CodeEditor
        value={logic}
        onChange={handleChange}
        extensions={[
          variableDropdownPlugin(variables),
          autocompletion({
            activateOnTyping: false,
            override: [autoCompleteVariables(variables)],
          }),
        ]}
      />
    </div>
  );
};
That activateOnTyping: false is important. Without it the context menu will appear after each keystroke (but if you want that then feel free to remove it).
And to see it in action, position the cursor in the editor to where you want the field and press [CTRL] + [SPACE] on your keyboard:
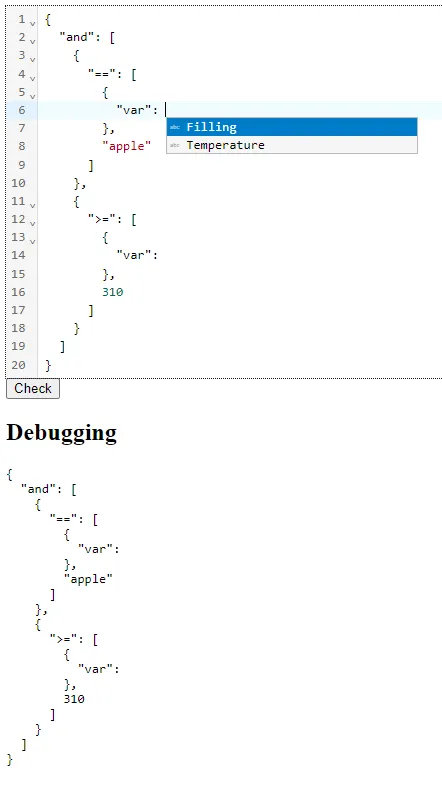
Your two plugins will work together to allow users to work with the field names, but behind the scenes it’s using UUIDs to maintain the integrity of the calculation.
Conclusion (and congratulations for getting to the end)
I knew this was going to be a long article, but I felt it was better to have everything together.
And I recognise that some people would like to see all the code, so here’s the repo:
GitHub - roryhering/variable-dropdown
Best of luck!